

Easy DIY Wall Art Idea
So let’s get to the tutorial. I promise it’s an easy one- I have two young kids: a 3 year old and a 15 month old, so I’m not available for marathon crafting sessions all day long! 🙂 When I want to craft something, it has to be quick and efficient and produce a fabulous final product! Here’s what you’ll need for this project.
Supplies:


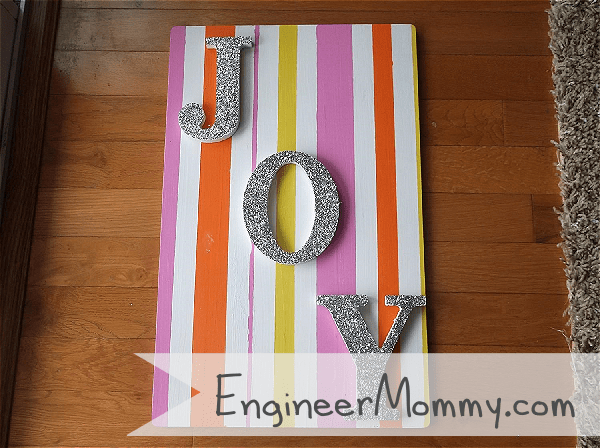
The rectangular piece of wood and the cardboard letters were picked up at the craft store. Everything else, I had on hand. The best part of crafting your own piece of DIY artwork is customizing the look of the piece. I knew I wanted a piece for the nursery, so I knew I was going to use pink, yellow and orange stripes for a bright, cheery and whimsical look. As far as the word, I picked “JOY” because my girls bring so much joy to our family and I feel like that word typifies what they represent to my husband and I.
Here are some ideas on ways to customize this piece for different rooms. How about a blue and white striped piece with the word “AHOY” for a nautical-themed bathroom? Or how about an elegant black and white striped piece with the word “LOVE” for a chic master bedroom addition? Or even a silver and gold striped one with the word “EAT” for the kitchen? The ideas are endless, and I might just have make some of these now! 🙂
The first step of this process is to paint the rectangular piece of wood white. It’s okay if the brush strokes are visible- it adds to the handmade nature of the piece. Next, lay your painter’s tape across the piece to designate the stripes you want to achieve in the finished piece. I chose stripes of varying widths because it’s more unpredictable, and because I didn’t want to have to measure everything too carefully! 🙂 Remember, I want this to be easy and fun!


Paint your piece with the accent colors. Pull off the painter’s tape while the paint is still wet to avoid peeling paint. Do any paint touch-ups, as necessary.


Paint your letters and apply Mod Podge to the front of the letters. Sprinkle liberally with glitter! Glitter makes me smile! Let the Mod Podge dry for a bit and then pick up the letters and let the excess glitter fall off.


Finally, use hot glue to attach your letters to your piece of wood. Using a hammer, attach a saw tooth picture hanger on the back of your piece of wood and hang it on the wall. Alternatively, you can use heavy-duty mounting tape to hang your picture on the wall.

I love it so much! And my 3 year old tells me it reminds her of candy – that’s a true testament to how much she loves it, too! 🙂


If you’d like to see some more DIY wall art, feel free to come on over to Engineer Mommy and check out my DIY nautical white burlap wall art, my DIY dollar store mirror art and lots more!
Thanks again, Sinea – it’s been a blast!
Wow, Jennifer, this looks great and you really broke it down to make it simple to do ourselves. Thanks so much for sharing your talent with us! … Sinea
Leave a Reply